YouTube is the largest video hosting and one of the most visited sites in the world. The 1st YouTube video was uploaded on the 23rd of April, 2005. Now almost 300 hours of video are uploaded onto YouTube every minute! The site gets over 30 million visitors per day what means that YouTube literally killed TV. Here you can find everything: movies, music videos, live shows and series, funny animal videos, kids videos and much more.
If you are a regular YouTube visitor, you might know some hidden features for watching geo- or age-restricted videos. But there are tons of cool options you can use to enrich your YouTube experience. If you wonder how to hack YouTube, we have awesome news! Here are 10 top secret YouTube tricks and hacks that we’ve collected for you:
- Tip 1. Share a video from a certain time
- Tip 2. Save videos for future viewing
- Tip 3. See the written transcript for any video
- Tip 4. Create a custom URL
- Tip 5. Delete or pause the history
- Tip 6. Get rid of ads
- Tip 7. Unlock videos restricted in your country
- Tip 8. Live stream videos
- Tip 9. Play the video on loop
- Tip 10. Create a photo slideshow on YouTube
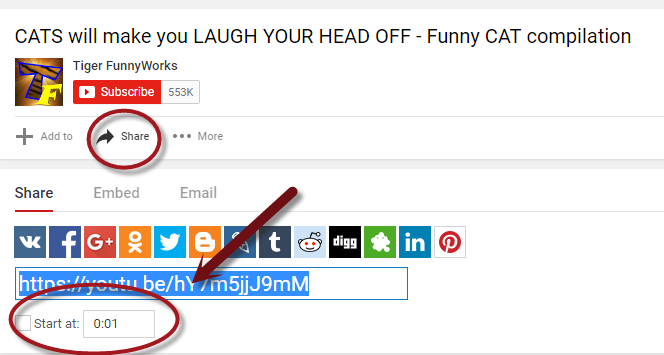
Tip 1. How to share a video URL from a certain time
Have you ever wanted to share only several seconds of a video and not the whole clip? Of course, you can ask your friend to watch a clip from a specific time but it’s much easier to share the video right with the moment you want to show. To create a YouTube link that starts from a certain time, you need to:
- Open the video in your browser;
- Click the Share button under the video;
- Select the Start at option right under the video link;
- Type the time you need or simply pause your video at this time;
- Copy the newly appeared link
SEE ALSO: YouTube Upload 101: Account, Specs, Limits, Formats
SEE ALSO: Deleting Videos from YouTube. 5 Easy Steps for Every Problem
Please note that this option is available to desktop users.
Now you can share this link with your mates. They’ll watch your video from a selected point.
Tip 2. Save videos for future watching
Sometimes it happens that you find a long video or several videos and don’t have time to watch them right away. In this way instead of copying videos’ links and saving them in a notepad, you can easily add them to a Watch Later default playlist. To add a video to the Watch Later playlist on your desktop, you should:
- Open a video in a browser;
- Log in to your YouTube account;
- Click the Add to button under it;
- Choose a Watch Later option.
To add a video to Watch Later playlist on iOS device, follow these steps:
- Install official YouTube app on your iPhone or iPad;
- Search for a video you want to save;
- Tap the Add to button under the video;
- Select a Watch later option from the menu.
 When you have time, return to YouTube and watch your video. Please note that if an owner deletes a video, you won’t be able to watch it. In case you want to stay on the safe side, you’d better download the video onto your PC. Let’s learn how to do it with YouTube Video Downloader. Follow the steps below:
- Download the software from Freemake official site;
- Install Freemake Video Downloader on your PC or laptop. Please keep in mind that the software works only on Windows;
- Run the software;
- Copy the link of YouTube video you want to save;
- Click the Paste URL button in the software;
- Select a format and quality for your video and a destination folder;
- Click the Download button to save it.
In a couple of seconds, the video will appear in a specified folder. You can also download playlist in the same way. However, the software lets you save only the playlists created by you or other users, not the default YouTube ones.
Very often YouTube videos have black bars because of the appropriate aspect ratio during the upload. You may easily crop a YouTube video after downloading with Freemake. For more information please visit its website.
Tip 3. See the written transcript for any video
Do you know that YouTube automatically generates a transcript for any video? It might come handy if you didn’t understand a particular phrase in a video or want to share some quote from it. To access the transcript of a video, you need to:
- Login to YouTube (use your e-mail);
- Open the video;
- Click the More button under it;
- Select the Transcript option.
If you don’t see this option among all available, it means that an owner of this video preferred to keep it hidden.
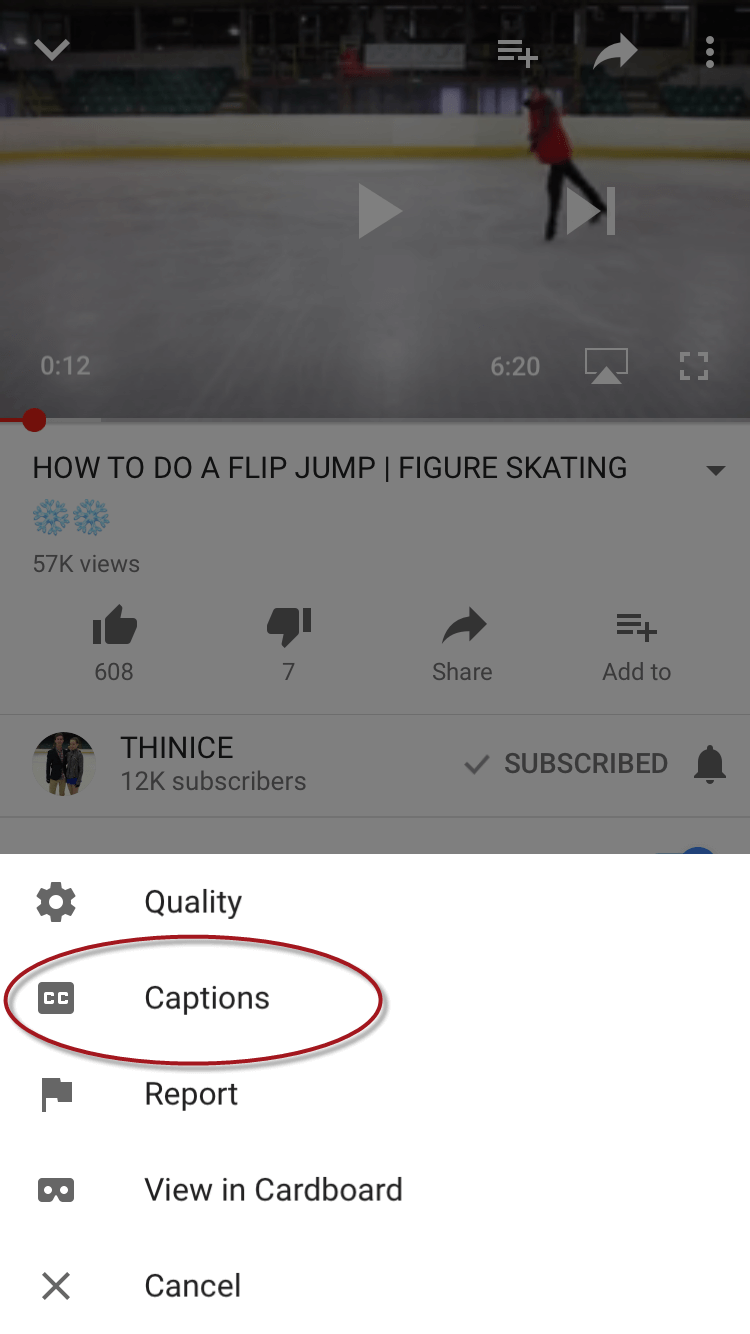
In case you watch a video on iPhone or iPad and want to see a transcript, check this guide:
- Start the YouTube app on your gadget;
- Choose a video;
- Tap the Three dots sign in top right corner;
- Tap the Caption option;
- Select the available transcript.
By the way, if you are a YouTube blogger, you can use transcripts to improve your video ranking in search. You can either paste it right into a description field or add to your video. Check our post A Complete Introduction to Video Editing on YouTube to learn what ways you can choose among to add a transcript to your video.
Tip 4. Create a custom URL
When you create a YouTube channel, it URL looks like a set of letters and figures. It’s not what your audience can remember, is it? So it’s better to change it for something one can easily recall.
Just keep in mind one thing: make sure you are comfortable with a chosen title. Once it’s approved, you won’t be able to change it anymore. Thus be attentive and don’t make any mistakes.
One more thing you should know is that you must be registered on YouTube for more than 30 days, have a profile pic and channel art to create a custom URL address.
To change your YouTube channel URL, follow the steps:
- Go to your YouTube account settings;
- Click Advanced under your name;
- If you meet all the requirements for a custom URL, you’ll see an option to claim it.
- Agree to the Terms of Service;
- Make sure you’ve typed your channel name correctly;
- Click Change URL to apply changes.
- From now on, your YouTube channel name will look like www.youtube.com/yourchosenname.
Please keep in mind that you should change your URL name from your desktop. This feature is not available in the mobile app.
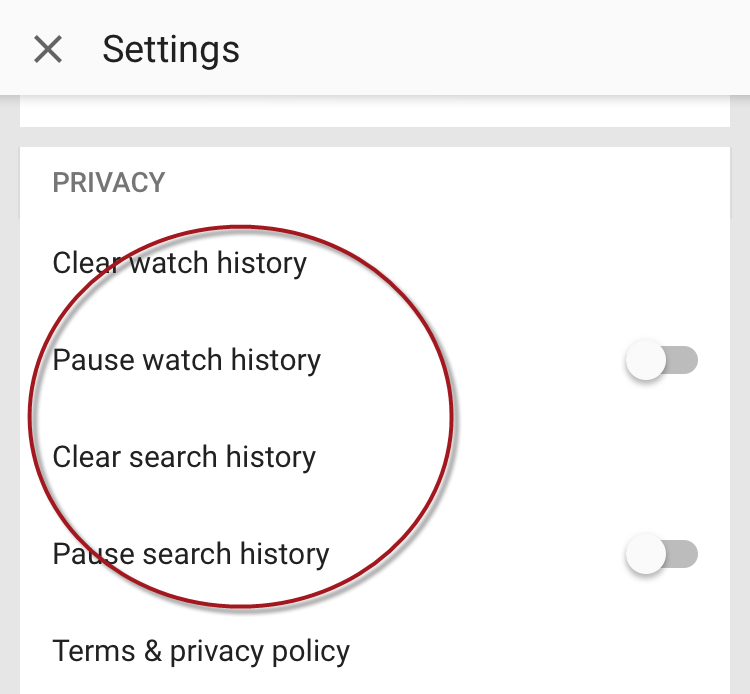
Tip 5. Delete or pause the history
Sometimes you might want to delete a particular YouTube video from your history or clear it completely. Why could you need it? Imagine that you checked a how-to guide on a particular topic. Since then you’ve already done the task, but the videos on this matter keep on showing in your related thread. It might be rather annoying. If you clean your history either from a certain video or from all the videos, you won’t get the unnecessary stuff in Related anymore. To do it on PC or Mac, you should follow the steps:
- Login into your YouTube account;
- Click the History tab in the left column;
- Click the Clear all watch history option under the YouTube search line to delete all the videos from your History or click the X sign near a video you want to delete.
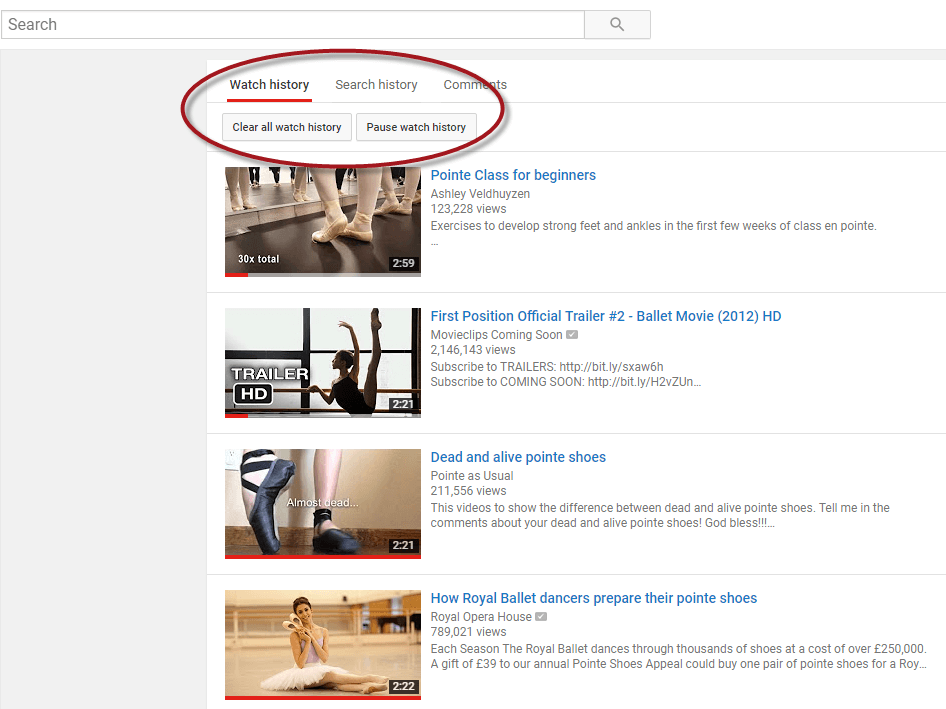
If you don’t want to clear the history or delete videos one-by-one, you can pause the history and restart it when necessary. The Pause watch history option is available in the History tab under the search line.
For iPhone, iPad or iPod Touch, check this how-to:
- Start the YouTube app;
- Log in to your account if you haven’t done it yet;
- Tap your profile pic in top right corner;
- Choose Settings;
- Scroll down unless you see the Privacy module;
- Choose whether you want to pause or clean the Watch history.
Unfortunately, the app doesn’t let you delete only several videos from your history. So if you tap the Clear watch history option, your watch history will be completely removed from all devices.
Tip 6. Get rid of ads
As any ads on social media YouTube ads is a boring thing that you barely want to spend your time on. It is not an easy issue to hack Youtube and stop ads, however we have found an option for you. There are two ways to get rid of the YouTube ads if you watch YouTube on a desktop.
The 1st one is to install a special extension – AdBlock for YouTube. It’s completely free. Simply download and install it in your browser and let it run. It’ll block most YouTube ads.
The next option to use is typing “youtubeskip” instead of YouTube. Your link will look like www.youtubeskip.com/watch?v=yourvideo/
The third solution you can use for any device (desktop, TV, mobile) is YouTube Red. It’s a monthly subscription service that removes ads from videos on all your devices. Please note that YouTube Red is not applicable to paid YouTube movies. They might still contain advertisements.
Whether you are a responsible parent, you could worry about the ads your kids might see while enjoying cartoons on YouTube. That’s where you need YouTube Kids. It’s a special app available for iOS and Android gadgets. With this app, you can stay cool. Your kids won’t see any inappropriate ads or content.
Tip 7. Unlock videos restricted in your country
Everyone has been in a situation of not being able to access a video in their country. Here there are also two ways how to hack YouTube which you can choose.
The easiest is to add “nsfwyoutube” in the URL instead of YouTube. So your link will look like www.nsfwyoutube.com/watch?v=-dBGnUSrjQo However, it may not always work.
The 2nd solution is finding free proxy settings online that you can use either with special video downloading software or within your web-browser. You can easily google for free proxy settings. There are few sites where you can get them. Alternatively, you may check our post with a ready solution.
Chrome users can benefit from a free plugin Proxy for Chrome. It has free proxy settings for a number of countries. Meanwhile, Firefox fans should install FoxyProxy Standard addon. Simply add the found proxy settings in browser extension and use them anytime you need by clicking the extension button.
As soon as you are done with that, follow the steps:
- Run Freemake Video Downloader;
- Go to File -> Options -> Connection;
- Click Enable proxy;
- Insert your proxy data;
- Click OK.
Now you can download the videos that are restricted in your area. Please keep in mind that when you are using a proxy, your downloading speed may decrease.
Don’t forget to disable proxy when you are done with watching or downloading. Then please try simply delete the settings to return to your original ones.
Tip 8. Live stream videos
Whether you feel brave enough and have a lot to tell your subscribers, you can broadcast yourself. Live streaming has become pretty much popular on social media since you can explain something to your subscribers and answer their questions right during the live session. If you are a gamer, you can show your gaming skills and explain your actions while playing. Although YouTube might be less popular for that scope than Twitch, a famous website with game videos, you can still use it for an additional promo. Btw, don’t forget that you can download Twitch videos with Freemake Video Downloader.
Unfortunately, it’s not about pressing one Start button. To be able to stream a video, you need to install special encoding software. The list of the approved tools and a how-to guide is available here.
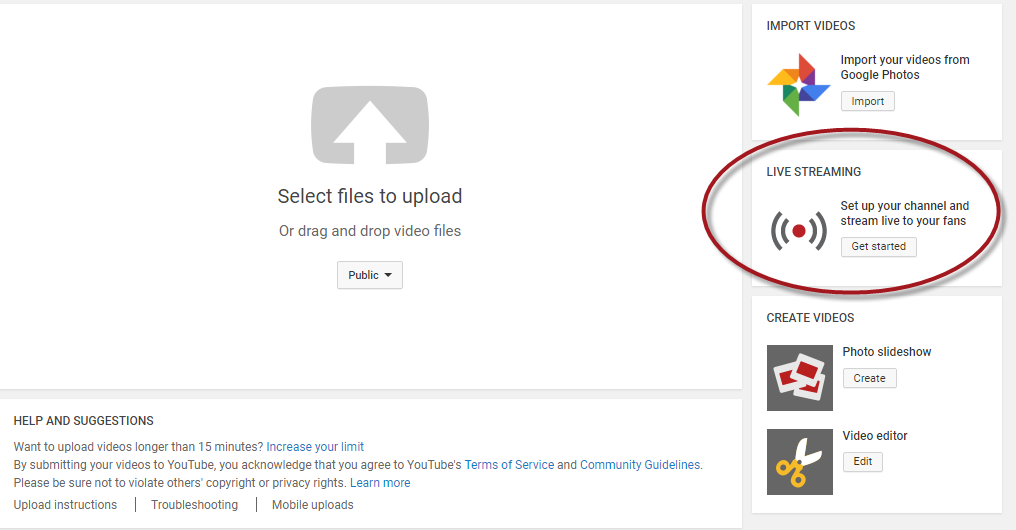
When you are ready, here is what you need to do to stream the video from a desktop:
- Go to YouTube and click the Upload video button;
- Select the Live Streaming option from the right column;
- Click the Get Started button;
- Make sure your account is verified with your phone number, and then click the Get Started blue button again;
- The will be loaded a settings page. Here you need to fulfill all the necessary text data;
- Open your encoding software;
- Start you live streaming by clicking the Start button.
From now on you can start speaking and sharing your thoughts and knowledge with your friends. To turn off the streaming process, use the Stop controller in your software.
By default, YouTube opens the Stream now page settings. However, there is one more live streaming option – Events. It’s available from YouTube dashboard on the left. The Events give you a bit more control over your video. For example, you can preview your recording before it goes live, schedule the right time for it, enable live chart, and so on.
As soon as you stop streaming, the backup of your video stream with be uploaded to your channel. By default, it’ll be available to all users. So don’t forget to enable the option Make archive private when complete (you can find it in Stream now -> Stream options) to make the recording available to selected users only.
YouTube also allows live streaming from its mobile app. Yet, to live stream from your smartphone, you should have at least 100 subscribers. As soon as you get them, come and follow this how-to guide:
- Install the latest version of the YouTube app;
- Tap the Camera button;
- Let the app access the Camera, Mic, and Storage of your phone;
- Verify your channel if necessary;
- Select Go Live option;
- Type title, description, then select a privacy setting for your video;
- Tap the back arrow sign;
- Select a picture for your thumbnail;
- Choose Go Live again and start recording.
To end the streaming process, tap Finish, and then OK. The archive of your stream will be uploaded to your channel.
Tip 9. Play video on loop
Sometimes you like a YouTube song so much that you want to listen to it again and again. Unfortunately, YouTube doesn’t provide a built-in loop function. Thus you need to use a third-party service. You can find a lot of free ones online.
For example, you can use InfiniteLooper (www.infinitelooper.com). You just need to paste a URL of the song you want to repeat and click the Search button.
Tip 10. Create a cool photo slideshow on YouTube
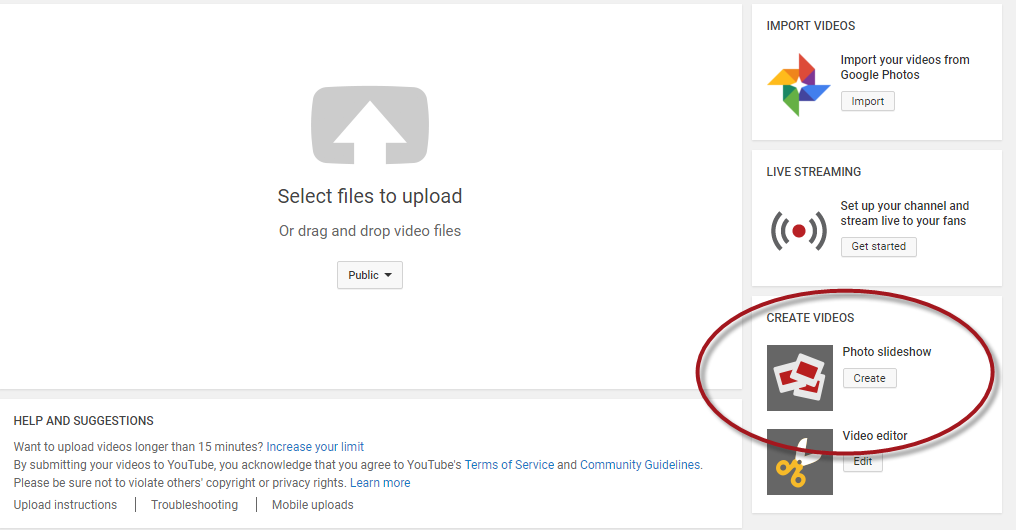
You know that you can upload videos and audio to YouTube, but it also lets you upload pics and create slideshows right on the site. If you want to show your holiday pics to your friends and colleagues or share with them on social media but you are lazy to install and learn to use software, YouTube is your choice. Here is what you should do to post your pics from your PC or Mac on YouTube:
- Click the Upload button;
- Select Create in the Photo Slideshow module;
- Upload pictures from your PC or G+ account;
- Click Select and drag-n-drop your images in the necessary order;
- Click Next and preview your slideshow;
- Add a music track from YouTube library;
- Click Upload to add a slideshow to your channel.
Alternatively, you can create a slideshow with Freemake Video Converter and upload it to YouTube right from the software.
These were 10 YouTube hacking tricks worth knowing about. Are there any other you use? Share them with us in the comments below.