
Millions of videos are added to YouTube each year. The video upload process is quite straightforward. However, there are certain things you should know. Let’s uncover all details in “YouTube Upload 101” guide-book!
Part 1. YouTube account
Part 2. YouTube file specs
Part 3. How to upload a video to YouTube from any gadget
Part 4. Known YouTube upload errors
Part 1. YouTube account: creation, limits, verification
YouTube doesn’t allow anonymous video uploads. So you need to make a YouTube account, if you don’t have it yet. Follow these steps:
1. Go to www.youtube.com and at the top right corner click the “Sign in” button.
2. Click the “Create account” link and jump to the registration page. You can add a mobile phone number to strengthen your account security.

3. Remember by accepting Terms & Conditions, you agree to use YouTube according to their policy. If you break the rules such as YouTube community guidelines, YouTube may close your account.
See here the reasons for possible account termination. Make sure you read and understand the TOS.
4. Basically, after the step #3 you can upload videos or you can go through 2 optional steps to get more advanced YouTube features.
5. [OPTIONAL] First of all, you can merge your Google+ account and select a vanity URL name for your YouTube channel. If you plan to start a popular YouTube channel, it’s highly recommended to link your YouTube channel and Google+ page. You’ll be granted you such option after account creation.
6. [OPTIONAL] The second extra feature is for hardcore YouTube users. There are 2 types of YouTube accounts: verified and unverified accounts. Unverified account owners can upload maximum 15 minute long videos. To get rid of upload limit, visit https://www.youtube.com/verify when you’re logged in your YouTube account and verify it by receiving a text message or a phone call. Verified YouTube account users may upload 11 hour long videos up to 128 GB file size.
PRO TIP: If you don’t want to verify your account, you can cut lengthy videos into 15-minute parts and upload them into one playlist. Use Freemake Video Converter to do it automatically.
Part 2. YouTube file specs: formats, resolution, size
One of the best YouTube features of 2015 is the ability to support 8 video formats for uploading: MOV, MP4 (MPEG4), AVI, WMV, FLV, 3GP, MPEGPS, WebM. Several years ago, YouTube accepted only a few formats and video had to be under 100 MB and 10 minutes long. Since then the site has changed its rules and now, when YouTube easily accepts 4K resolution, 360 degree videos and file sizes of 2 GB. In case your video camera has another format, you may always convert video to one of these formats with free Freemake Video Converter.
In most cases, YouTube optimizes your video for online playback. However, some settings will give the best uploading results. Let’s find out which ones.
Resolution
It’s recommended to upload videos in HD for quality playback. Obviously, you can shoot a video with your phone camera in one of the minimum resolutions like 240×180, but such video on TV will look quite bad.
Aspect Ratio
Use one of the standard aspect ratios: 4:3 or 16:9. When the video is uploaded to the site, YouTube will either leave it as-is (for 16:9) or add vertical black bars (for 4:3). Don’t add horizontal black bars before uploading a video. If you do it, black bars will be all around your video and it will look rather horrible. If your video already contains black bars, you’d better crop them with Freemake.
Frame Rate
If it’s possible, you’d better keep an original frame rate. Usually videos have the best quality if there frame rate is between 25-30 fps. Since spring 2014 YouTube supports 60fps frame rate that video gamers begged for. Some modern cameras give even 2000 fps, but YouTube doesn’t support such a quality yet.
PRO TIP: Learn more here about recommended frame and bitrates to covert video without losing quality for upload.
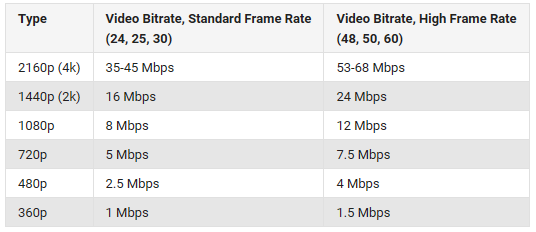
Bitrate
Bitrate is highly dependent on video codec. YouTube published recommendations on bitrate value. See the table below. If you convert video for YouTube, please try to stick to it.
Codec
Most suitable codecs for YouTube are H.264, MPEG-2 or MPEG-4. These codecs are used in most modern videos, so you’ll hardly need to change this parameter.
Format
YouTube is a video streaming site. So if you want to upload an audio track, a slideshow, a PowerPoint presentation or a cartoon to YouTube, you should encode it into a video format. YouTube states that the best format to use is MP4 (standard, HD and Ultra HD 4K quality). It’s not as heavy as AVI and provides better quality than FLV. WMV HD format seems to lose its quality, while 3GP and SWF resolutions are too small.
PRO TIP see here:
how to upload MP3 music to YouTube
how to upload photo slides to YouTube
how to add subtitles to a video for YouTube upload
Audio
Audio quality is not less important than video one. Even if your video track is a masterpiece, bad sound will spoil the whole idea. The recommended sound parameters are: MP3 or AAC format, 44.1kHz sampling rate and the higher bitrate possible, but no less than 192 kbps.
PRO TIP: You must own copyright on any audio accompanying your video. If you don’t have audio for your video file, you can add it from YouTube Audio Library. There are 2 types of audio tracks: royalty-free and ad-supported music. It’s up to you to select a track license type.
But even if you give a credit in video description to an original right holder, it doesn’t mean you don’t infringe the copyright. YouTube has a strict copyright policy. Please check it, so your account doesn’t get ceased.
SEE ALSO: Twitter Video Upload: All You Need to Know
Part 3. YouTube upload on PC, Web, iPhone, Android, Windows Phone, Xbox One, PlayStation 4
YouTube empowers users with many ways to upload a video including: web interface (a most popular type), from your mobile device like iPhone, iPad, Android via a special YouTube app, from a game console such as Xbox One, PlayStation 4. Unfortunately, Windows phones users don’t have an official app developed by YouTube.
How to transcode & upload video to YouTube from PC
If you have a multimedia file in an unsupported format from your camera, then you can convert video and upload it directly from your PC. Follow these steps:
1. Download and run Freemake Video Converter. It’s 100% free.
2. Add your file: video via +Video button, a DVD via +DVD button (or look how to rip a DVD disk with DVD Ripper in advance), photos via +Photo button or an audio via +Audio button.
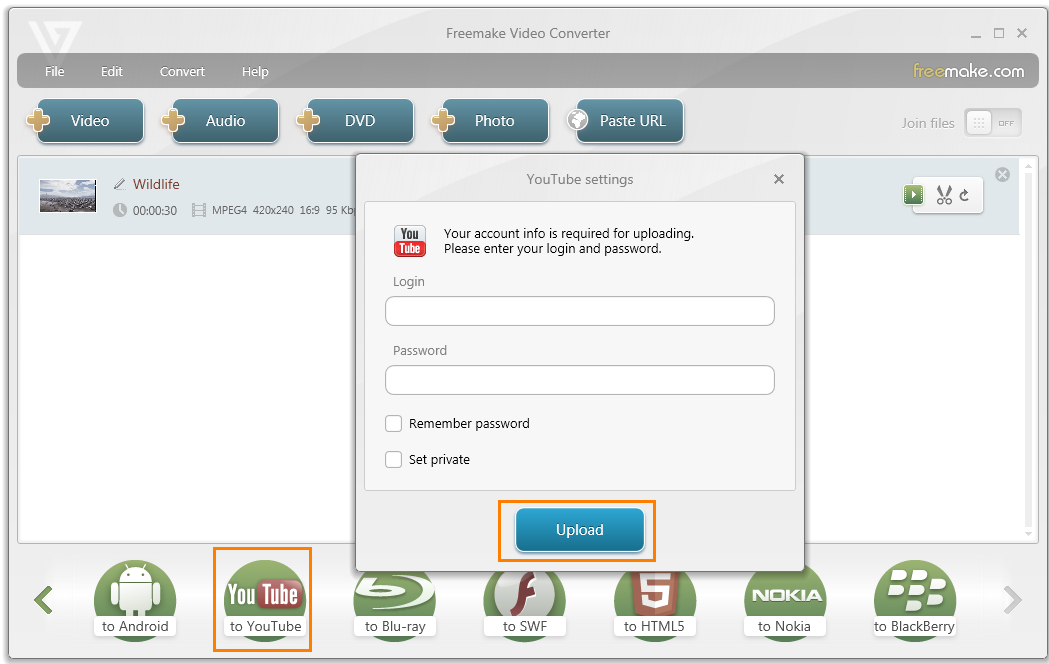
3. Edit your video if necessary. To do it, click the green button next to the file name. For example, you may add a watermark to the video or cut unecessary parts.
4. Click the “to YouTube” button as on the screenshot and enter your YouTube account credentials and hit the “Upload” button.
5. Please wait a few moments while your video is being uploaded to YouTube.
PRO TIP: Learn here how to compress or reduce video file size, so the upload gets faster.
How to upload video to YouTube via web
If your video matches YouTube supported formats, you can use YouTube website to upload videos.
Step 1. Visit www.youtube.com and click the “Upload” button at the right corner.
Step 2. Sign in your YouTube account.
Step 3. Select your YouTube video privacy settings. There are public, private and unlisted videos on YouTube. Public videos are visible for everyone. Private videos are visible for you. Unlisted videos are seen by anyone who has a direct link to it. Let’s say you need to share a family photo slideshow, you can pick the “Unlisted” setting and email a link to YouTube video to your family members.
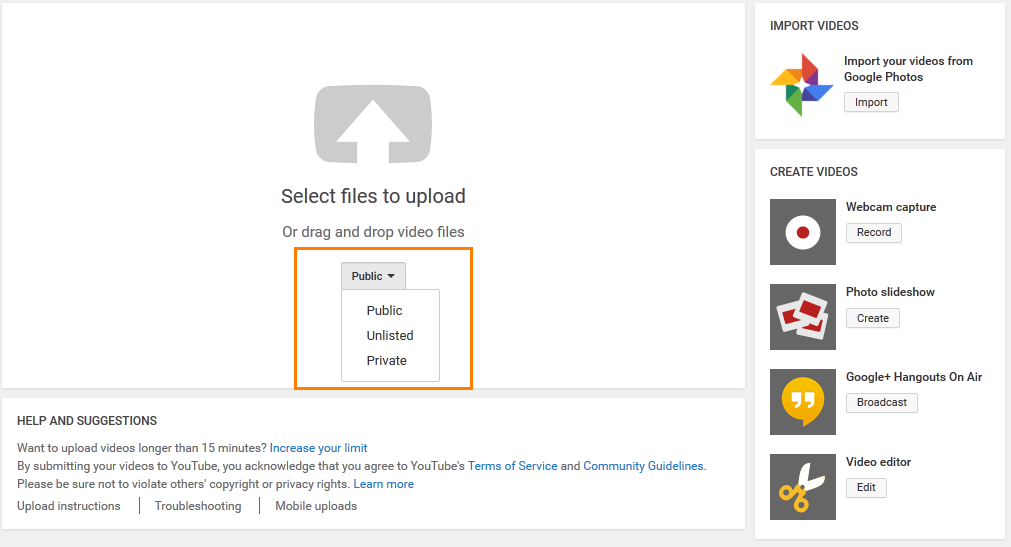
Step 4. Browse a video on your computer for upload.
It takes time to upload and process video. Meanwhile, you can add a title, description and tags for your video. If you have a verified YouTube account, you can add a custom thumbnail. If you have many videos, create a playlist.
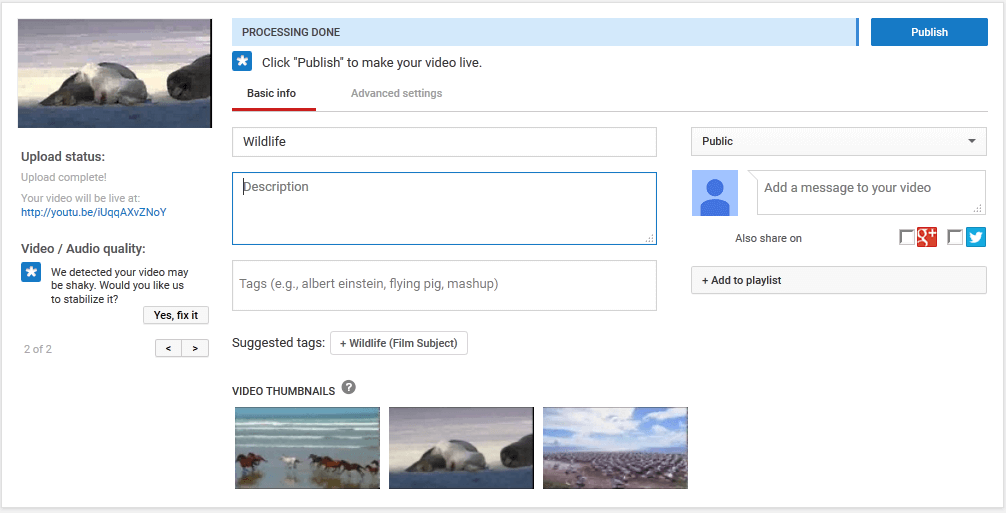
Step 5. Click “Publish” when you’re done.
PRO TIP: You can always delete a video if you uploaded a wrong footage by mistake. See how here.
How to upload video to YouTube from iPhone, iPad, Android
You can transfer videos to YouTube from your mobile gadget in the similar way as you do on web.
Step 1. Download an app for your device. You can find links to official apps here.
Step 2. Log into your YouTube account.
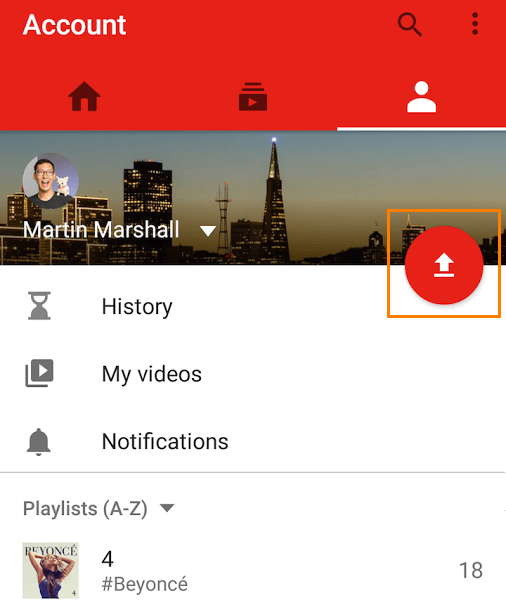
Step 3. On Android go to your account and hit the red arrow sign and find a video on your phone. If you have an iPhone or iPad, tap the hamburger sign and go to “My channel”, then hit the “Upload” sign.
Step 4. Wait till upload finishes, set privacy restrictions and click the “Publish” button.
How to upload a video to YouTube on Xbox One, PlayStation 4
If you’d love to record a game play screencast and share it on YouTube, please follow these steps:
Step 1. Make sure you have a YouTube app installed on your console and you are signed in.
Step 2. Go to your video records folder. Select a video for upload.
Step 3. Hit the “Upload” tile on Xbox One or “Upload Video Clip” on PS4.
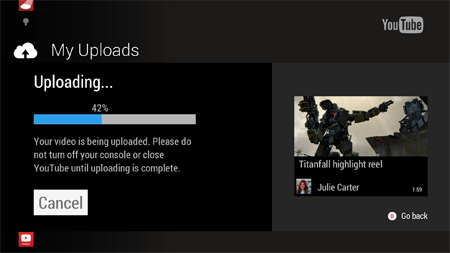
Step 4. Check privacy settings and publish it on YouTube.
PRO Tip: it’s better to use cable and export video to PC for editing and then upload it. For example, try Freemake Video Converter. For more reference see YouTube upload guides for Xbox One and PS4.
Part 4. Known YouTube upload errors: fix & troubleshooting
As all software YouTube has upload problems that you may face from time to time. Here are top 6 YouTube error messages:
1. “We have encountered unexpected problem”
2. “The server has rejected the file”
3. “An error has occurred while sending data over the network”
4. “An error has occurred while reading the uploaded file”
5. “A security error has occurred”
6. “Rejected (Duplicate Upload)”
If YouTube upload still does not work and you see one of these messages, try these quick fixes:
Step 1. Check your Internet Connection. Make sure it works fine.
Step 2. Make sure your firewall or antivirus doesn’t block video file upload. See the message of your security software.
Step 3. Keep your browser up-to-date. Certain features may work incorrectly in old browsers.
Step 4. Name your file shortly without any special symbols like #, % or *
Step 5. Use one of supported video formats and don’t upload big files if you have unverified YouTube account. Don’t upload the same video twice.
Step 6. Make sure that everything is OK with your video and it plays correctly on PC.
Step 7. Try again a bit later. YouTube server might be overloaded.
Share this guide with everyone who uses YouTube! What YouTube upload advice would you add to this tutorial? Tell us in comments.