Good free audio editing software will help you to produce awesome music. Modern audio editors can cut, trim, merge music, apply filters and effects, record sounds, mix music samples, change voice, normalize volume, make ringtones, mute silence and tons of other cool tricks. If you need to convert a track into another format, you can use Freemake Audio Converter, which is free MP3 converting software. But for more advanced features check top audio editors that we list here.
SEE ALSO: Best Websites to Download Free MP3
SEE ALSO: Top 5 Best Download Audio Tools
Audacity
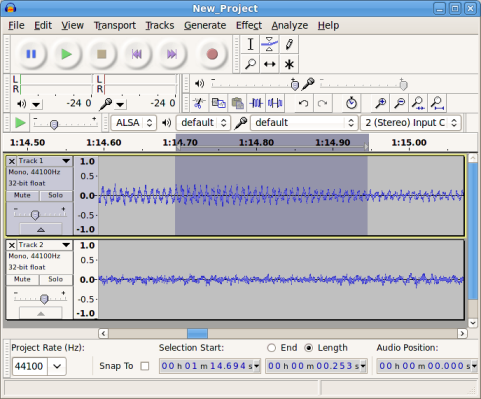
Audacity is the first on the list. Originated in 2000, Audacity is a pioneer of free sound editing freeware. The download is available for Windows, Mac, and Linux. What is Audacity? It is a powerful music editor that lets you perform all the necessary operations with audio files: record music, mix audio samples, cut and trim tracks, join several MP3s, apply effects, mute parts of a song, and much more! Audacity has an impressive list of supported audio formats including M4A, M4R, WAV, MP3, AAC, AIFF, FLAC, MP2, MP3, OGG & others. For the exotic music file extensions, use Free Audio Converter by Freemake and encode them into MP3s, WAVs or WMAs for further use in Audacity.

The program records sounds from microphones or mixers, streams audio and records multiple channels in the same row. The most required features of this freeware are cutting, mixing large number of tracks, changing the sound properties: pitch, tempo and altering the effects of the track. There are also some advanced effects available like adding echo or reversing. Let’s learn how to use Audacity!
How to Use Audacity
Audacity is intuitive in use. Even if you’re a newbie in multimedia production, you’ll learn how to edit audio in Audacity fast. Follow 3 key steps:
- Download and launch Audacity;
- Import an original audio track via drag and drop;
- On the wavepad form with your track, click the Selection Tool;
- Set selection marks and apply any of the options listed in the Edit menu to the audio part;
- When you’re done with the audio editing, go to File > Save Project to keep your changes;
- The last step is to export your project into a new music file. Go to File > Export audio > Format choose a file extension and hit the Save button.
Summary: The Audacity’s interface is modest. It may be considered as a drawback, but for the program which is absolutely free, you can pay no attention to the button styles. Well, Audacity is suitable and convenient for all the standard operations you may need.
SEE ALSO: 12 Effective Free and Paid Ways of Compressing Any Audio File [TEST RESULTS]
Live 9
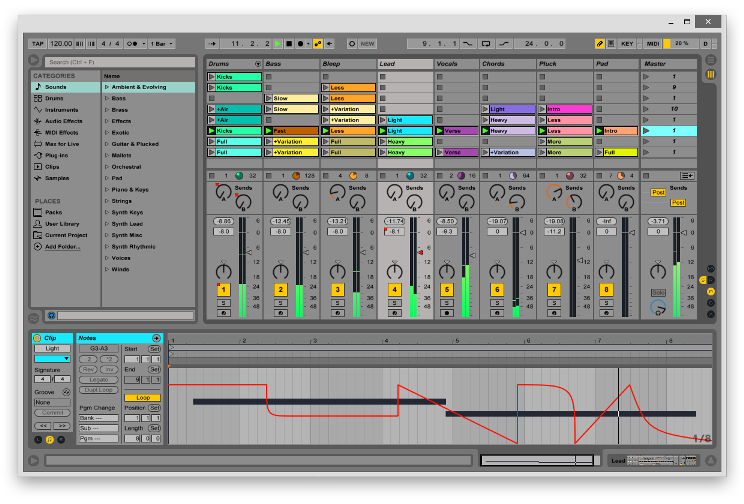
Live 9 is an advanced digital music workstation for DJs. Unlike Audacity, Ableton Live 9 enables professional musicians to broadcast live music sessions in night clubs and to perform real-time concerts. Live 9 is available for download on Windows and Mac.

It has a flexible interface and carries out almost any option you can imagine. Even background rhymes and chords are available for adding. So you can feel as a real music director and create your own masterpiece of live sounds. With Ableton Live 9 audio station software, you can record, mix, add effects, sync tracks, and much more. The cool perk of the Ableton software is the ability to work and produce MIDI files that every musician loves. Another advantage is a lengthy set of extra packs for musicians with various loops, samples, drum and instrumental mixes, rhythms, noises and melodies.
How to Use Ableton Live 9
Ableton Live 9 takes time to get used to. So you need to spend time on YouTube watching Live 9 tutorials. Be ready for it! Here’s a video guide for beginners:
- Download and start Ableton Live 9;
- Create a new live set via File> New Live Set;
- Download music samples to your PC and add them via Categories > Add Folder;
- Drag and drop desired music files (for example, from Instruments category) into the main window;
- Drag and drop samples into the Impulse drum machine;
- Tweak the sample’s settings like volume or frequency, if necessary;
- Preview your music creation and go to File> Live Set as, name your project and click the Save button;
- To save your project as an audio track or MIDI, jump to File> Export audio or File> Export MIDI clip.
Summary: If you are a musician or DJ, or just learning it, Ableton Live 9 is a right choice for you. The software is excessive for simple audio trimming or ringtone making. Live 9 audio editor is not completely free; a 30-day trial is accessible without paying. But is it’s enough and you’ll manage to dive into the world of sounds, you won’t find anything better.
WaveShop
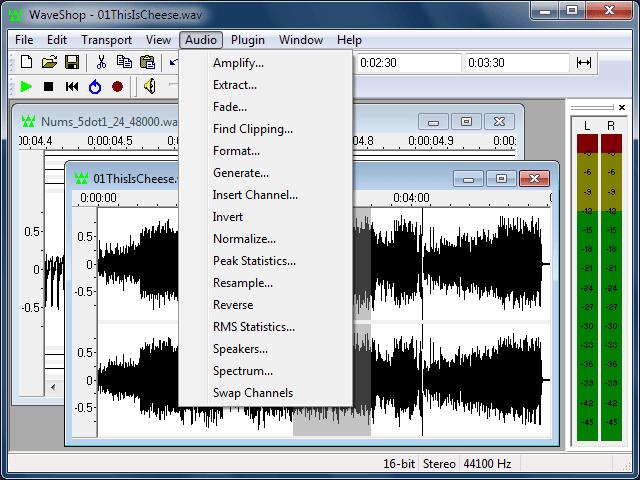
WaveShop is a free and lightweight audio editor for Windows OS. As a typical open source tool, WaveShop can’t boast of beautiful interface. It’s plain, but comprehensible for amateurs. The editing freeware has one feature: you can edit the only fragment of a file without affecting the whole track. It seems to be a helpful option for music mixes or creation of DJ samples.

Then, you can reorder some audio blocks to patch a song cover. Moreover, as a usual audio editor, WaveShop can cut, trim, merge MP3s, add audio transitions, normalize, amplify, reverse, fade audio, etc.
How to Use WaveShop
Let’s learn how to cut music in WaveShop. Follow simple steps:
- Download and launch WaveShop;
- Add an original song via File > Open;
- Look at the wavepad and hit the Pause button;
- Choose a part of the track with your mouse cursor;
- Right click on the selected part and hit the Cut option;
- When you’re done, go to File > Save as to save your project;
- Later you can export the edited file via File > Export option.
Summary: WaveShop is a pure open source product. If your mission is to make some technical alterations, go for this editor.
Wavosaur
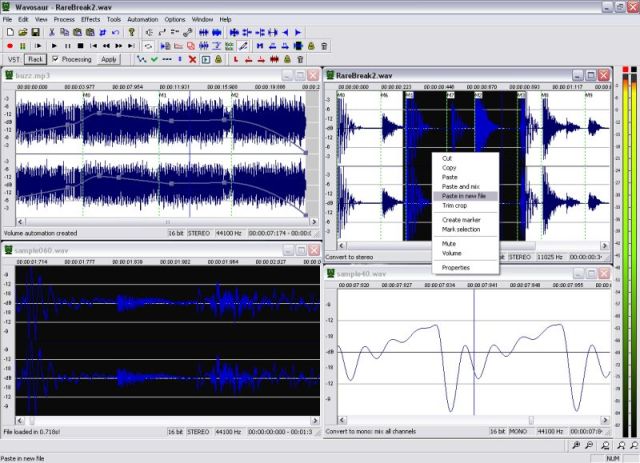
Wavosaur fulfills all the simple missions like cutting, pasting, editing, pitch shifting and processing sounds. It supports VST effects plugin, working with multiple files at once, changing volume and voice, even muting the audio flows, fading in and out. Unfortunately, Wavosour audio editor is only suitable for Windows and it doesn’t have software installer. So, basically, you have to download an archive and use file compression software to unpack it.

Installation of Wavosaur isn’t a piece of cake. The interface is plain and not user-friendly at all as you need to puzzle your brain about the meaning of the buttons and icons.
How to use Wavosaur
To facilitate software installation, watch Wavosaur video tutorial and follow all steps:
- Download and unzip Wavosaur audio editor as shown in the video;
- Add an audio file by clicking the file folder button;
- Use the selection tool and your mouse cursor;
- Apply a desired action (for instance, hit the Scissors button to cut file);
- When you are ready, click the Save button.
Summary: Well, those who have time to learn the program’s insights will be quite satisfied with this version. The software is donation-based. So if you enjoy Wavosaur features, please support the developers.
MEF Music Editor
MEFmedia Music Editor is Windows freeware which looks stylish and works fine. It is claimed to be so easy to use that even a tyro of sound editing won’t get lost in it. The most common features like recording, cutting, copying, pasting, deleting and CD burning are inside. So, if you want to record the altered media file on the portable CD, this audio editor is right for you. The free software workflow is similar to Wavosaur. You can add file or a CD disk, go to the wavepad form and apply a sound effect or filter.

Summary: MEF Music Editor is good for advanced, but non-professional users. There are all popular features of an audio editor.
And now, what will be your choice?


