Video is a great way to speak to your site audience and convey information in an entertaining way. Adding a video to a site is not as easy as uploading it to YouTube. It’s great if your site template or CMS lets do it flawlessly. Otherwise, you can spend countless hours trying to make the video work. To avoid this situation, you have to choose the appropriate video embedding method for your site or blog. Read the post below and you’ll learn:
- what video formats suit for embedding;
- what web video standards exist;
- how to embed video in HTML5;
- how to embed YouTube video;
- how to put Vimeo video on site;
- how to use old school Flash video;
- how to add a video to WordPress site.
SEE ALSO: Download YouTube Videos 1080p [FREE & Easily]
What is Video Embedding?
Video embedding is putting a video into website coding. It means that the video player is integrated in the web page. Video embedding isn’t limited to simple uploading of a video to some server. It’s a far more complicated process. You will need a video in a specified format and a web player to stream it.
Video formats for embedding
Please make sure you understand the difference between a desktop and web video. The first one may be presented in a majority of formats: AVI, MP4, MKV, WMV, TOD, TS, etc. Web videos found massively on video sharing sites are streaming videos. In such videos all the content is sent in a continuous stream of data and is played as it arrives.
SEE ALSO: Best Way to Convert MKV to AVI Free & Fast
 Not any video format can be streamed, only WebM, MP4, QT, MOV, WMV, FLV, SWF, 3GP, RM and some others. The matter is that those formats are closely connected with streaming video middleware:
- FLV and SWF are proprietary video containers of Adobe Systems, which are played via Adobe Flash Player,
- WMV can be streamed with Microsoft Windows Media Player,
- QT and MOV are associated with Apple QuickTime player,
- RM refers to RealNetworks’s RealPlayer.
In this row, MP4 (H.264, AAC) seems to be the most common format for video streaming on the Internet. It’s not associated with any particular middleware and can be streamed in the majority of desktop and mobile browsers.
Web video standards
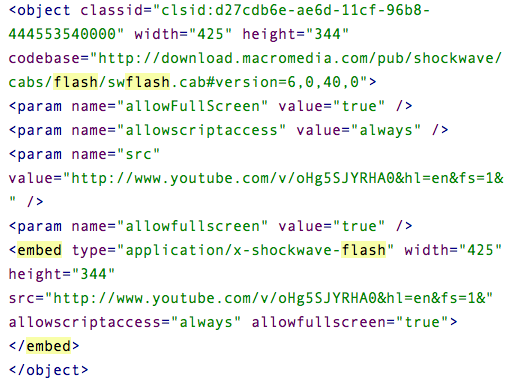
In 2011 it was a real problem for a non-technically minded person to put video on site. There existed only one web standard known as HTML4 which didin’t allow webmasters to embed videos directly onto web pages. <iframe> or <object> tags with the reference to some middleware (like Flash Player or RealPlayer) were required. This way video embed code looked like in HTML4 coding:
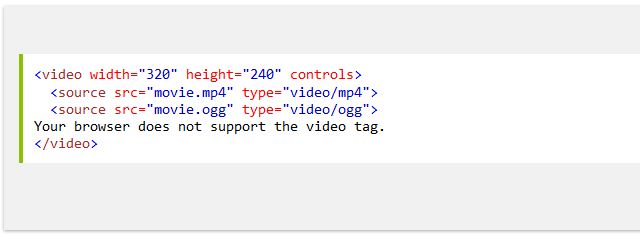
Happily, everything changed with the advent of HTML5 in 2015. This new standard brought the possibility to embed videos without any middleware, just via <video> tag in the web page markup. All you need to put a video to your website is a video file in the required format and a simple web player code like this one:
One definite advantage of HTML5 over HTML4 is the cross-plarform support. HTML5 video is played equally well on PC, smartphone, and tablet.
5 Ways to Put a Video onto a Website
Now let’s explore the most popular ways of video embedding, their pros, cons and what websites they suit best of all.
1. HTML5 video player
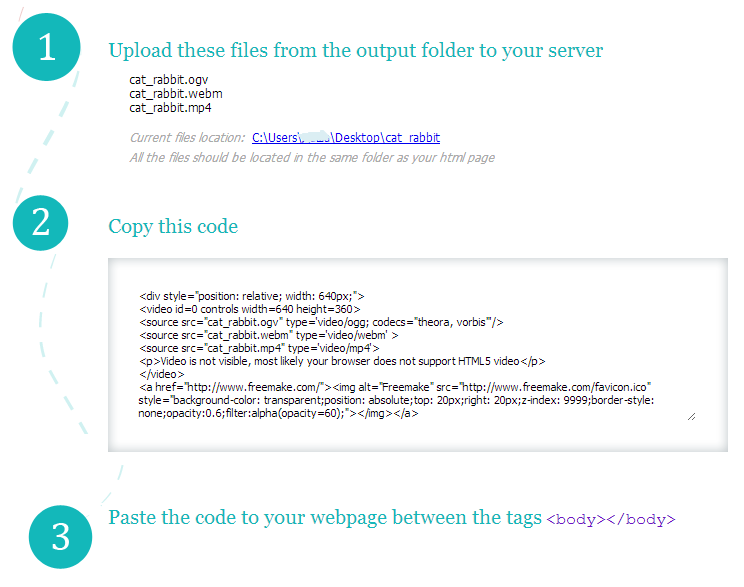
HTML5 video player is an ideal solution if your website audience comes from different devices. To add HTML5 compatible video to your site, you need to prerare video files in three formats: MP4, WebM, OGG, as different browsers support different video qualities. You may easily do this with Freemake Video Converter. If you need just WebM format, follow these steps. The free software converts any desktop or online video to HTML5 formats and provides ready embed code to paste onto your web page.
Follow this guide to prepare your video to HTML5. After the conversion you’ll get the following instruction to embed HTML5 video to your website.
This way HTML5 player looks like on a website:

Some paid solutions like JW Player or Projekktor provide player customization and some advanced options, such as call-to-actions, subtitles embed, etc. See our comparison of top 6 HTML5 video players in our previous post.
Pros:
- your web video will be streamed on mobile devices;
- you don’t need to urge people install any middleware like Adobe Flash Player to play your video;
- all modern browsers support HTML5 video tag.
Cons:
- old Internet Explorer versions won’t stream HTML5 videos;
- you need to host videos on your server;
- you have to prerare video in three formats.
Resume: HTML5 video player will perfectly suit your site if you prefer in-house video hosting to public video services.
2. YouTube
YouTube web player seems to be the easiest and most common solution to embed a video onto a website. Since 2015 YouTube provides video playback both in Flash and HTML5. It means that the uploaded to YouTube videos can be streamed both on PC and gadgets.
To embed a YouTube video, you need:
Step 1. Create a YouTube channel and upload your video to it.
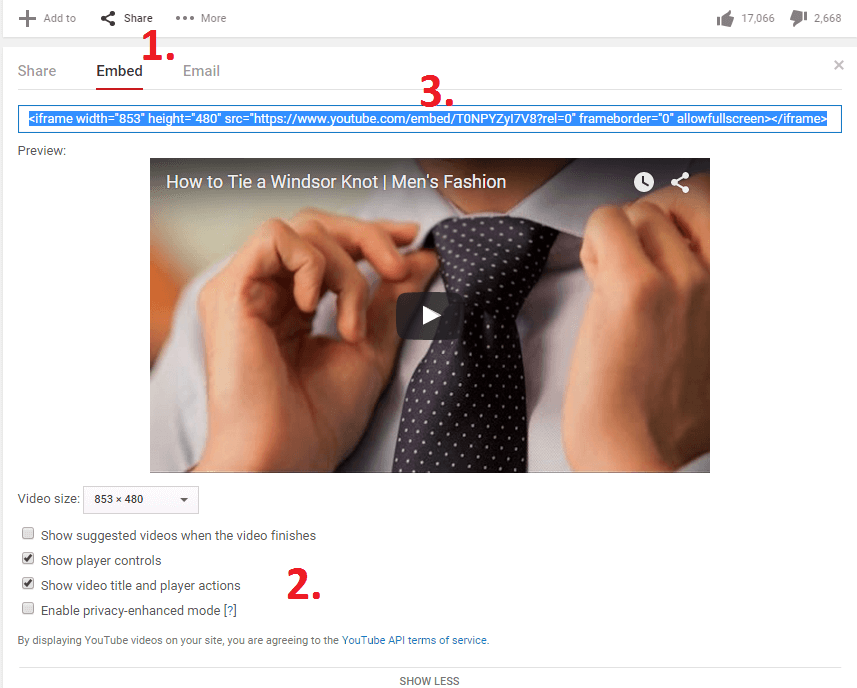
Step 2. Open the video and click Share, then Embed.
Step 3. Click Show more and customize the player if necessary.
Step 4. Copy the embed code the site provides and paste it onto your web page.
The video player on your website will look like in the same way as on YouTube. Though you may hide player controls and customize its size.
Resume: Embedding videos from YouTube fits websites of all scales. Small sites can save money on video hosting, while big ones may gain additional brand visibility on YouTube and Google search with their videos.
Pros:
- easy to implement;
- no need to host videos on your server (and pay for this!);
- video promotion and advertising opportunities;
- cross-platform video playback.
Cons:
- site visitors may proceed to YouTube and leave your website;
- YouTube may add ads on your video if it doesn’t comply with their copyright policy;
- dependance on YouTube hosting;
- little player customization.
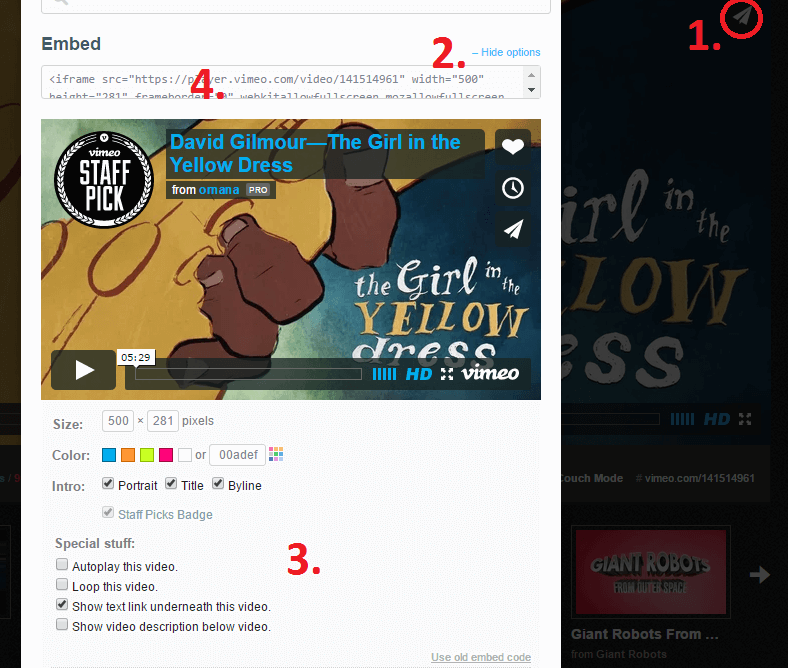
3. Vimeo
Vimeo is another popular site for video sharing. In contrast to YouTube, it offers premium options alongside with free video hosting. Vimeo Plus & PRO ($59.95 or $199/year) options include HD video uploading and embedding, fully customizable HTML5 player, advanced video management and privacy options. A free Basic account also allows users to get embed video code for pasting on their websites.
To embed a video from Vimeo, follow the steps:
Step 1. Create a Vimeo channel and upload your video into it.
Step 2. Open the video player and click the Share button on it.
Step 3. Go to the Embed section and click More options to customize your player.
Step 4. Copy the embed code and paste it onto your web page.
Many web designers agree that Vimeo player looks more stylish than YouTube one. However, Vimeo’s video promotion opportunities are far behind its main competitor’s ones.
Pros:
- free video hosting;
- nicely looking web player;
- cross-browser support;
- basic web player customization.
Cons:
- premium account is needed for HD video embedding;
- poor video promotion options;
- site visitors may distract and continue watching on Vimeo.
Resume: Embedding videos from Vimeo is an ideal solution for Plus & PRO subscribers, as they can receive all the benefits of public video hosting and adjust the web player to their needs.
4. HTML video embed (via Flash Player)
Adobe Flash Player was an extremely popular means to stream videos in HTML coding during the past 10 years. However, with Apple’s refusal to support it on iOS devices and the advent of HTML5, Flash Player is less used now. However, you still can use this old school video embedding method if your site visitors come largely from PCs and have old browser versions.
Flash Player is capable of streaming only FLV and SWF video formats. So you need to convert your video to one of these formats.
Read this tutorial about how to convert video to Flash with Freemake Video Converter. The software transforms your video files to Flash formats and provides ready embed code with the following instruction:
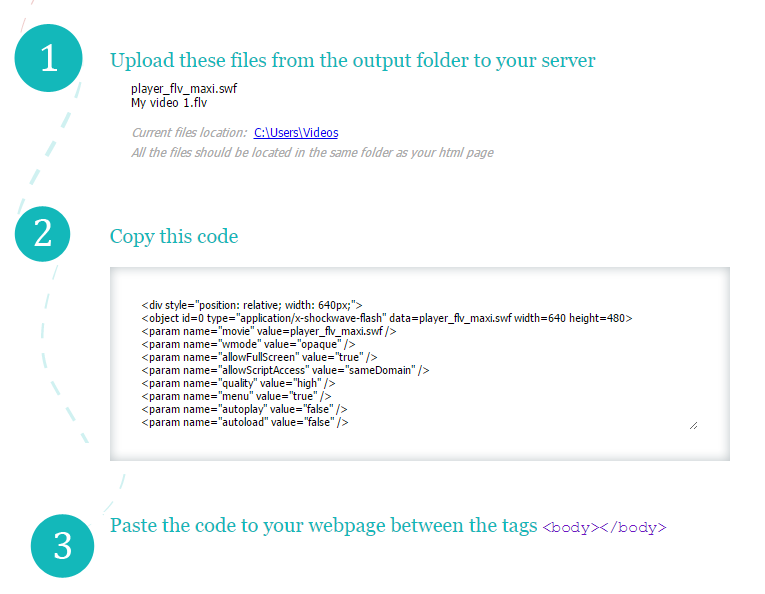
The video player will look like in this way:

If you have basic HTML coding skills, you may easily customize this player to your needs.
Pros:
- time-tested web video standard;
- SWF videos can contain interactive objects;
- it’s easy to prepare Flash videos with free software.
Cons:
- no mobile playback support;
- you need to host video on your server;
- requires Flash Player plugin to be installed to play videos.
Resume: Flash Player option is for websites aimed at desktop visitors and coded in HTML4.
5. WordPress web video player
WordPress is the most famous open-source platform for blogging and not only. Since 2003 it has undergone through dozens of updades. One of such releases brought the opportunity to upload and embed videos into posts in the same way as you upload images. No doubt, the video must be in one of the streaming formats. It’ll aslo be troublesome to upload large videos, as many WordPress accounts are limited to 100 MB video size.
To embed a video into WordPress article, do the following:
Step 1. Make sure your video is in MP4, WMV, FLV, MOV, SWF format. If necessary, use our MP4 converter for re-encoding.
Step 2. Go to WordPress console and open the post or page where you want to add a video.
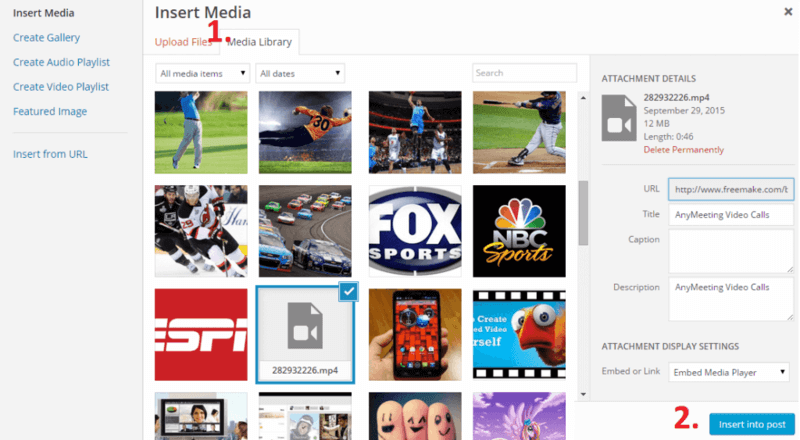
Step 3. Click the Add Media button, then Upload files and select your video file.
Step 4. Make sure that the Display Settings are swithched to Embed Media Player and insert the video into the post.
The default WordPress web player looks like this:
Another great WordPress option is direct embed from YouTube, Vimeo, Dailymotion, Vine and some other video sites via URL copy-paste into the post. To do this, choose the Insert from URL tab instead of Upload files, paste the video URL and your video will be embedded into the post. Alternatively, you may just add a video link into the post itself and WordPress will add its web player to it.
- easy to implement;
- allows embedding from numerous sites.
Cons:
- file upload limit;
- video needs to be in streaming format;
- requires inhouse video hosting;
- no player customization.
Resume: this is the best video embedding option for WordPress sites, but only for them.
6. Freemake Slider Plugin for WordPress
Freemake Slider Plugin for WordPress is a great option for those who need to embed multiple videos on WordPress-based blog or site. If you don’t want to have 20 videos going one after another and make your visitors endlessly scroll to reach the end of your post, Freemake Slider is right what you need.
To embed videos on your WordPress blog or website with Freemake Slider, simply install it from here. Then go to the plugin settings and choose to create a new slider. Select Add YouTube option. You can also add YouTube playlist, offline videos from your PC, and Vimeo videos. Upload your offline videos or insert your YouTube/Vimeo video links. Then select a style for your video slider. Customize any settings like playback (autoplay, random, circular), responsive options, style options if necessary, and click Save & Publish.
When you are done, copy the ready shortcode and paste it into your post or website where you want your videos to be.
Pros:
- free;
- easy to use;
- keeps multiple videos in a compact way;
- many slider styles;
- highly customizable;
- supports online and offline pictures, video, and audio files.
Cons:
- you need to have YouTube API to use Freemake Slider with YouTube playlists.
Resume: Freemake Slider is a great choice to add multiple multimedia content on your site. It doesn’t have any limits and organizes your video, audio or pics in the best way possible.
We hope you managed to make a decision which video embedding methods suits your website. In case you have any questions, feel free to ask them in the comments below.